
Design Brief- A local furniture company has been throwing away thousands of dollars worth of 3/4" hardwood scraps from their furniture. Due to the material being expensive the furniture store has been loosing profit. In order to return value to the store the company would like to sell 3x3 cubes to be sold as desktop novelty items. The puzzle cube must be made out of 27 cube blocks which are glued together to form 5 separate parts. the parts can not have more then 6 hardwood cubes but less them 3. Also no 2 parts can be the same and some parts should interlock.
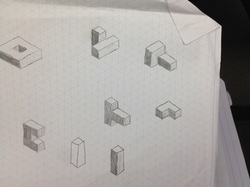
Sketches- These are my isometric sketches for the puzzle cube. I had to edit some of the
pieces due to the constraints for example the part on the top left had over
6 individual parts so it was not a valid piece. Also I had 6 parts in all
instead of five, so I changed some of my pieces like the bottom left part
and the middle part. My sketches resulted in me choosing my final design
which is a revised version of my sketches.
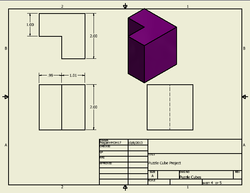
Inventor Modeling- In inventor I modeled each individual part and dimensioned them to the proper measurements. First I created a 2D sketch then I extruded the piece. The purple piece on the left was drawn using the line tool and created 2 rectangles. Then I extruded the sketch to make my puzzle cube. The Isometric drawing corresponds to the multi view drawings which are dimensioned.
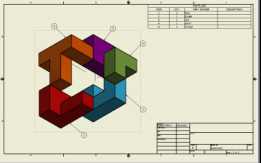
Inventor Drawings- In Inventor I used sketches to make the 5 parts of my puzzle cube. The first piece I made was separate from every other pieces of the puzzle cube. When I finished designing every puzzle piece and creating multi view drawings for every puzzle piece I put them in assembly which is how I created the drawing on the right which includes all 5 puzzle pieces and which piece is which.
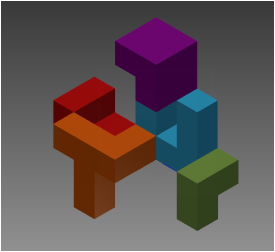
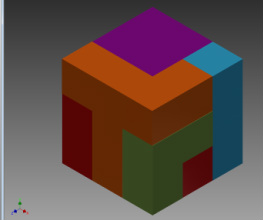
Inventor Assembly-In the inventor program I attached different sides of each individual piece to
create one puzzle cube made out of the five different pieces. This picture shows all the cubes unattached in the net picture you can see how the cubes interlock. I connected the purple piece with the blue piece and flushed (attaching the sides together so the cube has 0 degrees of freedom) the sides together. Then I attached the red and the orange and flushed the red side with the blue side. Last I attached the green to the red piece and flushed the green and the red together. The puzzle cube now had 0 degrees of freedom meaning it could not move forward, side to side, up or down, and clockwise.
create one puzzle cube made out of the five different pieces. This picture shows all the cubes unattached in the net picture you can see how the cubes interlock. I connected the purple piece with the blue piece and flushed (attaching the sides together so the cube has 0 degrees of freedom) the sides together. Then I attached the red and the orange and flushed the red side with the blue side. Last I attached the green to the red piece and flushed the green and the red together. The puzzle cube now had 0 degrees of freedom meaning it could not move forward, side to side, up or down, and clockwise.
Reflection- After completing the Puzzle cube project I learned what it would be like to be faced with a real world problem and have to solve it. This project taught me a lot in inventor and was a really good learning experience for figuring out how things in real life relate to the program. First creating the blocks using wooden blocks then later creating each block individually and finally connecting them all together showed what an engineer really would do. Doing this project has made me realize how engineers really solve problems.
